uGUIでテキストにアウトラインをつける方法
文字に枠をつける方法です
1. アウトライン項目の追加
アウトラインをつけたいテキストを選択した状態でツールバーから
「Component」 > 「UI」> 「Effects」 > 「Outline」を選択する

2. アウトラインの設定
インスペクターにアウトラインの項目が出てくるので、色等を設定すれば完了

Unityのボタンのenabled/setActive/interactableの違い
UnityのuGUIを作成したときに、条件に応じてスクリプトから選択出来なくしたり、消したりしたい時が出てくると思いますが、その際に使う関数について
今回確認するのは
- Button.enabled = true/false;
- Button.interactable = true/false;
- GameObject.setActive(true/false);
まずはuGUIからボタンを作成

ステータスを変更するスクリプトの作成
using UnityEngine;
using System.Collections;
using UnityEngine.UI;

public class buttonStatus : MonoBehaviour {
	Button buttonA;
	Button buttonB;
	Button buttonC;
	GameObject buttonD;

	// Use this for initialization
	void Start () {
		buttonA = GameObject.Find ("Canvas/ButtonA").GetComponent<Button> ();
		buttonB = GameObject.Find ("Canvas/ButtonB").GetComponent<Button> ();
		buttonC = GameObject.Find ("Canvas/ButtonD").GetComponent<Button> ();
		buttonD = GameObject.Find ("Canvas/ButtonC");
	}

	// Update is called once per frame
	void Update () {
		buttonB.enabled = false;
		buttonC.interactable = false;
		buttonD.SetActive (false);
	}
}
結果

Buttonオブジェクトに対して
enabled
- true/falseを代入することでステータス変更
- falseにすると選択できなくなる
- 見た目は変わらない
- GameObjectには使えない
interactable
- true/falseを代入することでステータス変更
- falseにすると選択できなくなる
- disabledステータスになり、見た目もグレーがかった半透明になる
- GameObjectには使えない
GameObjectに対して
setActive
- true/falseを引数にとることでステータス変更
- falseにすると選択できなくなる
- 表示自体が消える
- ButtonObjectには使えない
telegrafで収集したメトリクスをInfluxDBに保存し、Grafanaで表示させる方法
influxDB

- 時系列データベース
How to Install
curl -sL https://repos.influxdata.com/influxdb.key | sudo apt-key add -
source /etc/lsb-release
echo "deb https://repos.influxdata.com/${DISTRIB_ID,,} ${DISTRIB_CODENAME} stable" | sudo tee /etc/apt/sources.list.d/influxdb.list
sudo apt-get update
sudo apt-get install influxdb
sudo service influxdb start
  Starting the process influxdb [ OK ]
  influxdb process was started [ OK ]
confirm
コンソールから
$ ss -lntp | grep 808
	State       Recv-Q Send-Q   Local Address:Port      Peer Address:Port
	LISTEN      0      128                 :::8086                :::*   <== API
	LISTEN      0      128                 :::8088                :::*   <== ????
	LISTEN      0      128                 :::8083                :::*   <== GUI

$ influx
> SHOW DATABASES
	name: databases
	---------------
	name
	_internal

> SHOW USERS


> USE _internal
	Using database _internal

> SHOW MEASUREMENTS
	name: measurements
	------------------
	name
	database
	httpd
	queryExecutor
	runtime
	shard
	subscriber
	tsm1_cache
	tsm1_wal
	write
telegraf

- goで書かれたInfluxDB専用のメトリクスコレクター
- fluentdなどを介さずにInfluxDBにデータを送れる
reference
How to install
wget https://dl.influxdata.com/telegraf/releases/telegraf_0.13.0_amd64.deb
sudo dpkg -i telegraf_0.13.0_amd64.deb

ll /usr/bin/telegraf
  -rwxr-xr-x 1 root root 33438580 May 11  2016 /usr/bin/telegraf*

ll /etc/telegraf
  total 64
  drwxr-xr-x  3 root root  4096 Mar 14 05:54 ./
  drwxr-xr-x 85 root root  4096 Mar 14 05:54 ../
  -rw-r--r--  1 root root 51626 May 11  2016 telegraf.conf
  drwxr-xr-x  2 root root  4096 Mar 14 05:54 telegraf.d/
configuration
telegraf -help

### test( show data for just stdout)
$ telegraf -config /etc/telegraf/telegraf.conf -input-filter cpu -test
	* Plugin: cpu, Collection 1
	* Plugin: cpu, Collection 2
	> cpu,cpu=cpu0,host=vagrant-ubuntu-trusty usage_guest=0,usage_guest_nice=0,usage_idle=100,usage_iowait=0,usage_irq=0,usage_nice=0,usage_softirq=0,usage_steal=0,usage_system=0,usage_user=0 1457941353810729019
	> cpu,cpu=cpu-total,host=vagrant-ubuntu-trusty usage_guest=0,usage_guest_nice=0,usage_idle=100,usage_iowait=0,usage_irq=0,usage_nice=0,usage_softirq=0,usage_steal=0,usage_system=0,usage_user=0 1457941353810729019

### execute
$ telegraf -config /etc/telegraf/ telegraf.conf
	2016/03/14 04:20:56 Starting Telegraf (version 0.13.0)
	2016/03/14 04:20:56 Loaded outputs: influxdb
	2016/03/14 04:20:56 Loaded inputs: processes swap system cpu disk diskio kernel mem
	2016/03/14 04:20:56 Tags enabled: host=vagrant-ubuntu-trusty
	2016/03/14 04:20:56 Agent Config: Interval:10s, Debug:false, Quiet:false, Hostname:"vagrant-ubuntu-trusty", Flush Interval:10s

	2016/03/14 04:21:00 Gathered metrics, (10s interval), from 8 inputs in 18.586633ms
	2016/03/14 04:21:10 Gathered metrics, (10s interval), from 8 inputs in 18.634299ms
	2016/03/14 04:21:10 Output [influxdb] buffer fullness: 22 / 10000 metrics. Total gathered metrics: 22. Total dropped metrics: 0.
	2016/03/14 04:21:10 Output [influxdb] wrote batch of 22 metrics in 9.96326ms

	2016/03/14 04:21:20 Gathered metrics, (10s interval), from 8 inputs in 17.925556ms
	2016/03/14 04:21:20 Output [influxdb] buffer fullness: 12 / 10000 metrics. Total gathered metrics: 34. Total dropped metrics: 0.
	2016/03/14 04:21:20 Output [influxdb] wrote batch of 12 metrics in 4.152709ms

	2016/03/14 04:21:30 Gathered metrics, (10s interval), from 8 inputs in 25.871113ms
	2016/03/14 04:21:30 Output [influxdb] buffer fullness: 12 / 10000 metrics. Total gathered metrics: 46. Total dropped metrics: 0.
	2016/03/14 04:21:30 Output [influxdb] wrote batch of 12 metrics in 53.397404ms
	.
	.
	.
confirm
$ influx
	> show databases
		name: databases
		---------------
		name
		_internal
		telegraf   # added

	> use telegraf
		Using database telegraf

	> show measurements
		name: measurements
		------------------
		name
		cpu
		disk
		diskio
		kernel
		mem
		processes
		swap
		system
grafana

- visualizingツール
- ダッシュボードを作成する
How to install
sudo vi /etc/apt/sources.list
	### add below list
	deb https://packagecloud.io/grafana/stable/debian/ wheezy main
curl https://packagecloud.io/gpg.key | sudo apt-key add -
sudo apt-get update
sudo apt-get install grafana

$ ll /usr/sbin/grafana-server
	-rwxr-xr-x 1 root root 22354891 May 16  2016 /usr/sbin/grafana-server*
$ ll /etc/init.d/grafana-server
	-rwxr-xr-x 1 root root 3291 May 16  2016 /etc/init.d/grafana-server*
$ ll /etc/default/grafana-server
	-rw-r--r-- 1 root root 274 May 16  2016 /etc/default/grafana-server
$ ll /etc/grafana/
	total 20
	drwxr-xr-x  2 root root    4096 Mar 14 08:06 ./
	drwxr-xr-x 86 root root    4096 Mar 14 08:06 ../
	-rw-r-----  1 root grafana 7921 May 16  2016 grafana.ini
	-rw-r-----  1 root grafana 3188 May 16  2016 ldap.toml
$ ll /var/log/grafana/
	total 20
	drwxr-xr-x  2 grafana grafana 4096 Mar 14 08:06 ./
	drwxrwxr-x 10 root    syslog  4096 Mar 14 08:06 ../
	-rw-r--r--  1 grafana grafana 9070 Mar 14 08:06 grafana.log
$ ll /var/lib/grafana/
	total 88
	drwxr-xr-x  3 grafana grafana  4096 Mar 14 08:06 ./
	drwxr-xr-x 40 root    root     4096 Mar 14 08:06 ../
	-rw-r--r--  1 grafana grafana 71680 Mar 14 08:06 grafana.db
	drwxr-xr-x  2 grafana grafana  4096 Mar 14 08:06 plugins/

$ sudo service grafana-server start
$ ss -lntp | grep 300
	LISTEN     0      128                      :::3000                    :::*
Data source setting
- influxDBのデータを利用する設定を行います
- http://192.168.33.11:3000/loginへアクセス
- ユーザ名とパスワードは「admin:admin」

- Data sourceの設定
- 左上のGrafanaアイコン > Data Sources > Add data source

以上でAddをクリックすれば初期設定は完了です
Graph setting
- 次に設定したデータソースからグラフを作成します
- 左上のGrafanaアイコン > Dashboards > New
- 何もない画面が表示されるので、左の左色の部分からGraphの新規作成を選択します

- まずは一番最初にData sourceの項目を編集して、先ほど作成したtest_dataに変更します

- そうするとクエリー文を作成する項目が一番上に出てくるので、取得したい項目に応じて設定を行います

設定がうまくいっていると上のように実際にデータが取得できます
クエリーを追加していくことによって項目を増やすこともできます

UnityでOculusなどのHMDの向いてる方向を取得する方法
HMDの向いている方向を取得する方法です
Oculus Riftで確認しましたが、GearVRでも同じ処理で取得できるはずです
情報の取得
using UnityEngine;
using System.Collections;
using UnityEngine.VR;     // enable to get HMD direction

public class Direction : MonoBehaviour {
    void Update () {
        Quaternion direction = InputTracking.GetLocalRotation (VRNode.Head);
        Debug.Log (direction);
    }
}
- HMDの情報をとるためにまずはUnityEngine.VRの利用を宣言します
- 実際の情報取得はInputTracking.GetLocalRotationで行い、引数で右目や左目、中央などを指定できます。
- Headは中央(CenterEye)と同じ値を返します
返り値
返り値は以下のような形になります
(float, float, float, float)
- それぞれ[-1.0~1.0]の範囲の値を返します
- 起動時からHMDを動かさないと(0.0, 0.0, 0.0, 1.0)を返します
- (a, b, c, d)として
- a
- 首を縦に振る動きの取得
- 上を向くとマイナス
- 下を向くとプラス
- b
- 首を横に振る動きの取得
- 左を向くとマイナス
- 右を向くとプラス
- 一回転(360度)以上は注意が必要(後述)
- c
- 首をかしげる動きの取得
- 右にかしげるとマイナス
- 左にかしげるとプラス
実際に方向の取得
using UnityEngine;
using System.Collections;
using UnityEngine.VR;     // enable to get HMD direction

public class Direction : MonoBehaviour {
    void Update () {
        Quaternion direction = InputTracking.GetLocalRotation (VRNode.Head);

	// 前向き
	if (-0.25f <= direction [1] && direction [1] < 0.25f) {
	    Debug.Log ("center");
	// 後ろ向き
	} else if (direction [1] <= -0.75f || 0.75f <= direction [1]) {
            Debug.Log ("back");
	// 左向き
	} else if (0.25f <= direction [1] && direction [1] < 0.75f) {
            Debug.Log ("left");
	// 右向き
	} else if (-0.75f <= direction [1] && direction [1] < -0.25f) {
            Debug.Log ("right");
	}
    }
}
これで向いている方向を取得することができました。
しかしこれだけだと実はHMDが一回転以上すると右と左が反対になってしまいます。
前→右→後→左→前→左(←本当は右にならなければいけない)
これを回避するためにdirectionの4つ目の値を利用します
using UnityEngine;
using System.Collections;
using UnityEngine.VR;     // enable to get HMD direction

public class Direction : MonoBehaviour {
    void Update () {
        Quaternion direction = InputTracking.GetLocalRotation (VRNode.Head);

	// 前向き
	if (-0.25f <= direction [1] && direction [1] < 0.25f) {
	    Debug.Log ("center");
	// 後ろ向き
	} else if (direction [1] <= -0.75f || 0.75f <= direction [1]) {
            Debug.Log ("back");
	// 左向き
	} else if (0.25f <= direction [1] && direction [1] < 0.75f) {
	    if (direction [3] < 0) {
		Debug.Log ("left");
	    }else{
	        Debug.Log ("right");
	    }
	// 右向き
	} else if (-0.75f <= direction [1] && direction [1] < -0.25f) {
            if (direction [3] < 0) {
		Debug.Log ("right");
	    }else{
		Debug.Log ("left");
	    }
	}
    }
}
これで何回転しても正しい方向を取得できるようになりました
UnityでXboxコントローラの3Dスティックではなく十字キーで移動させる場合
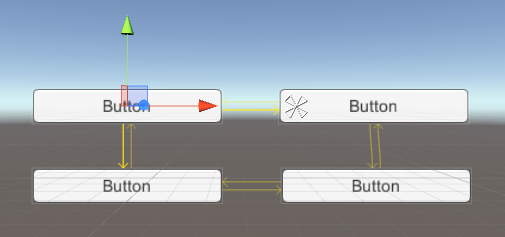
Unityでボタンを複数作成するとデフォルトでXboxコントローラの左スティックで移動できるようになりますが、左スティックを無効にして十字キーで動かしたい場合の方法です。
手順
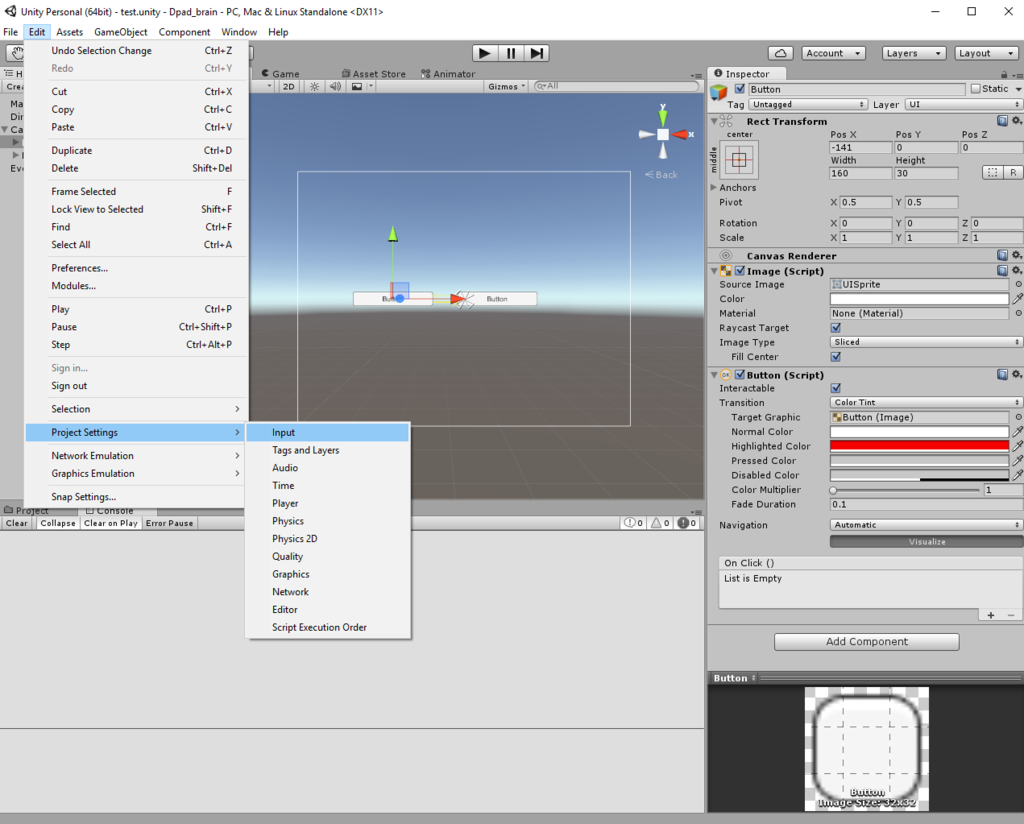
1. Inputマネージャーを開く
Edit > Project Setting > Input
2. Input マネージャの確認
Inspectorに以下のようなInputManagerが開きます
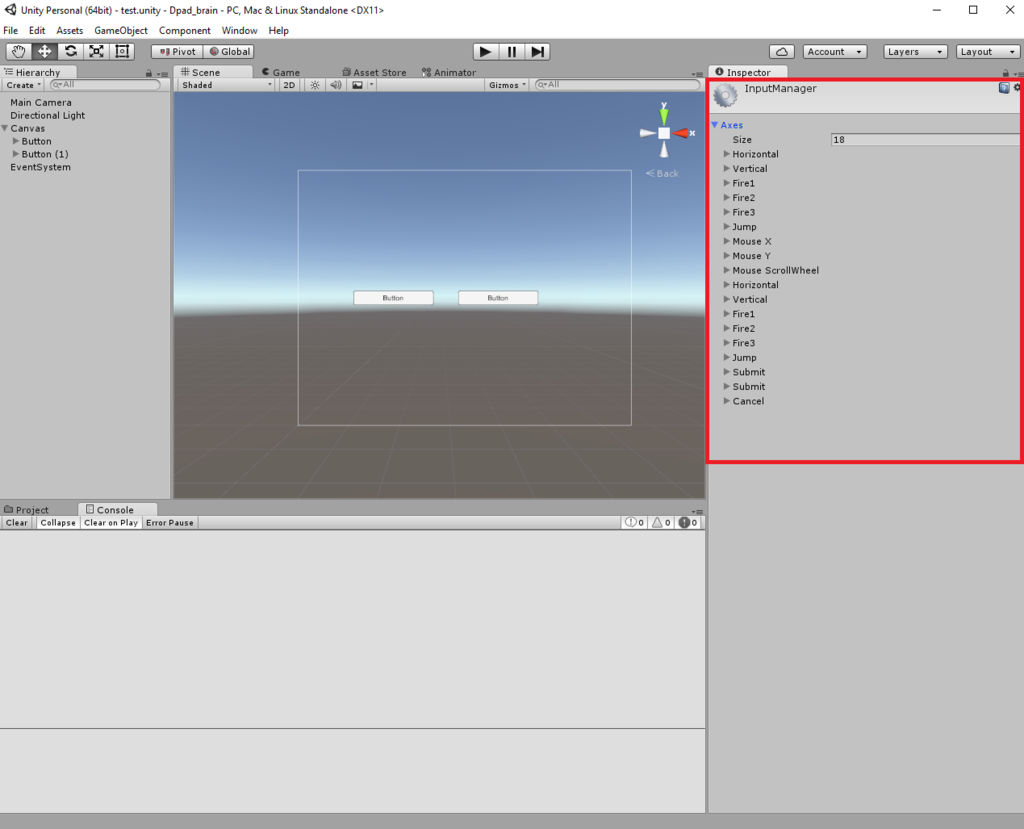
カーソルの移動はこの中の「Horizonal」と「Vertical」の項目が担当しています
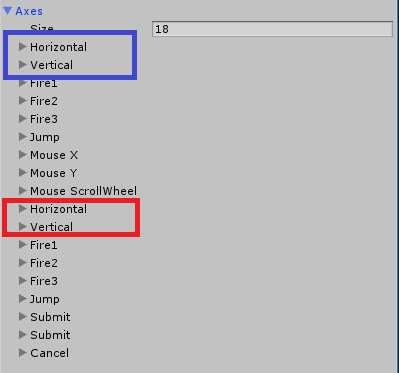
HorizontalもVerticalも2つずつありますが、上の方(青枠)はマウスやキーボードの矢印キーで動かすための設定ですので、デバッグ用にこのまま残します
下の方(赤枠)がコントローラによる移動の設定ですので、こちらの設定を変更していきます
3. Input マネージャの設定
それぞれの項目を開くと以下のように詳細が表示されます
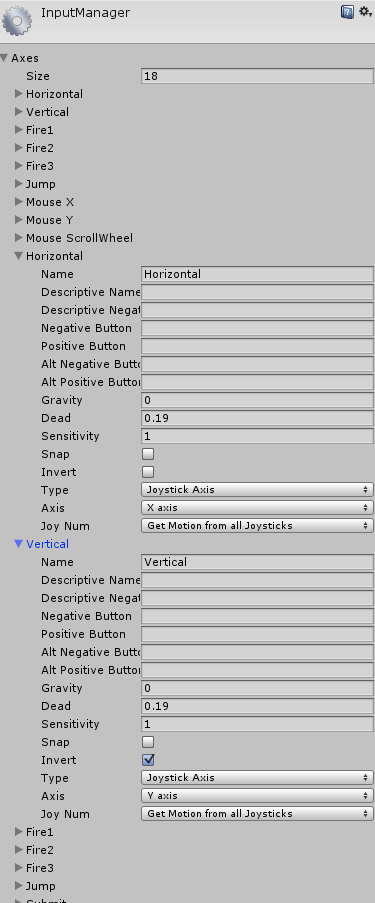
まずはAxisの部分を変更します
- X axis ⇒ 6th axis(Joysticks)
- Y axis ⇒ 7th axis(Joysticks)
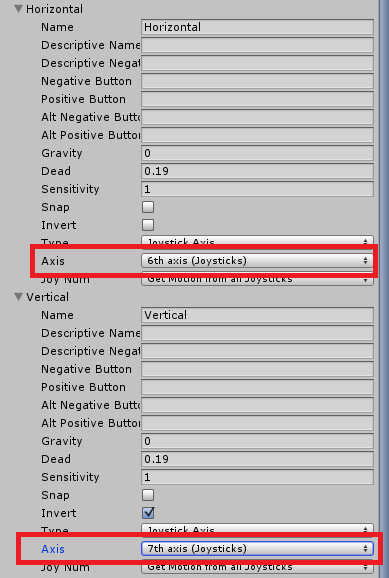
次にVerticalの方のInvertのチェックを外します
(これを外さないと上下の入力が逆になってしまいます)

4.確認
以上で作業は完了です
適当にボタンを作って確認してみましょう
Unityでボタンの表示を文字じゃなくて画像にする方法
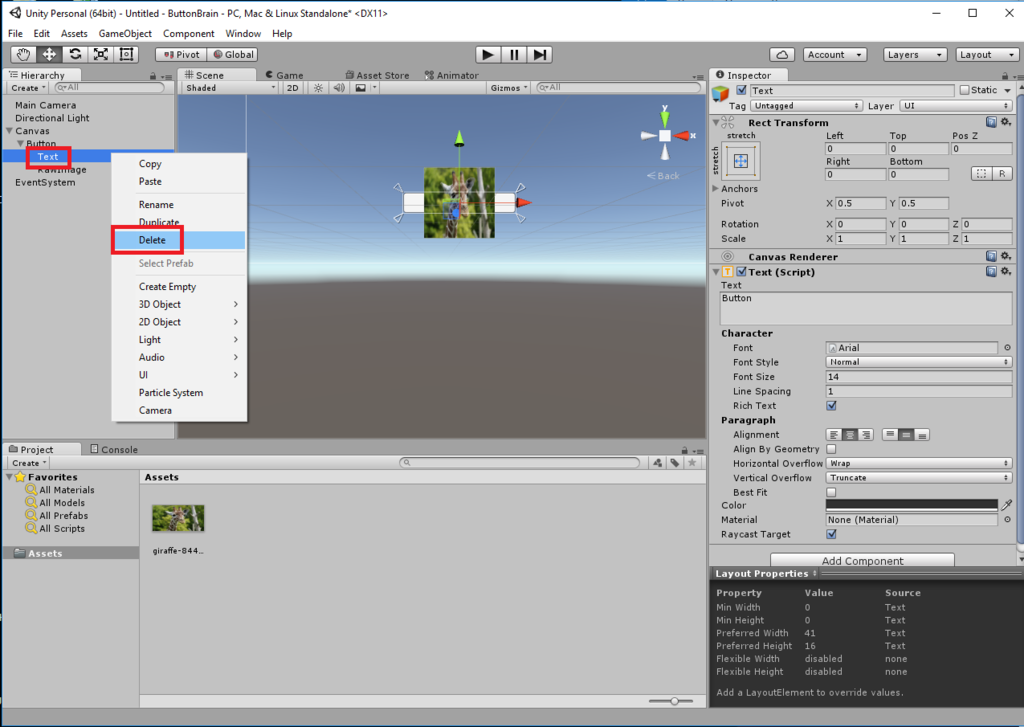
まずは普通にUnityを起動してHierarchyから「UI > Button」を選択すると以下のような感じになると思います。
この文字ベースのボタンを画像ベースのボタンに変更します
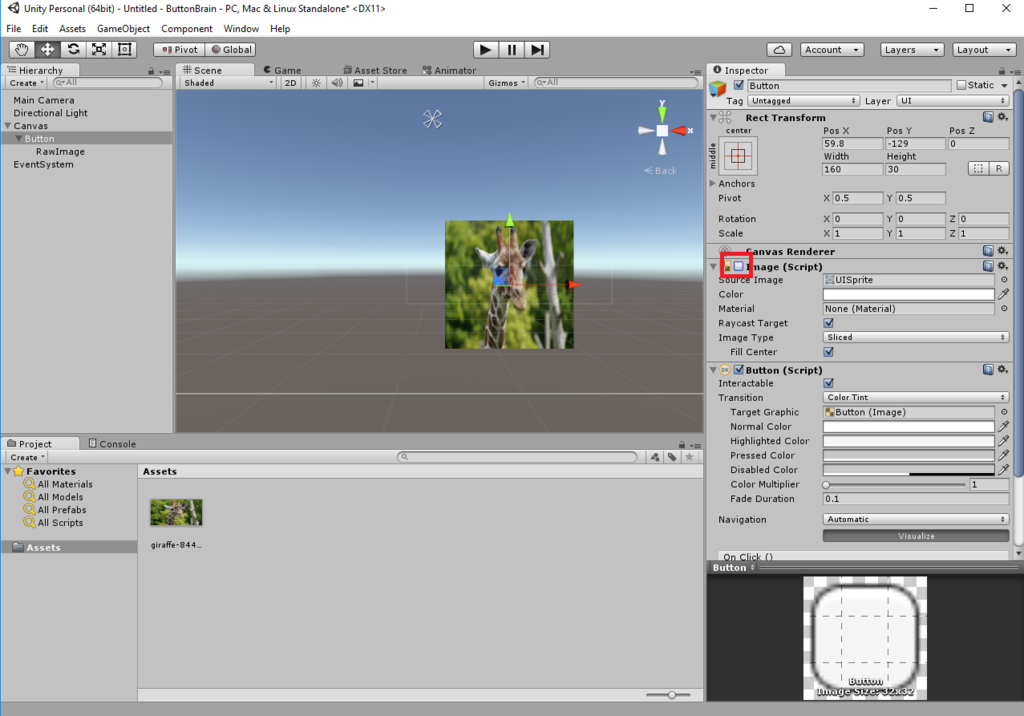
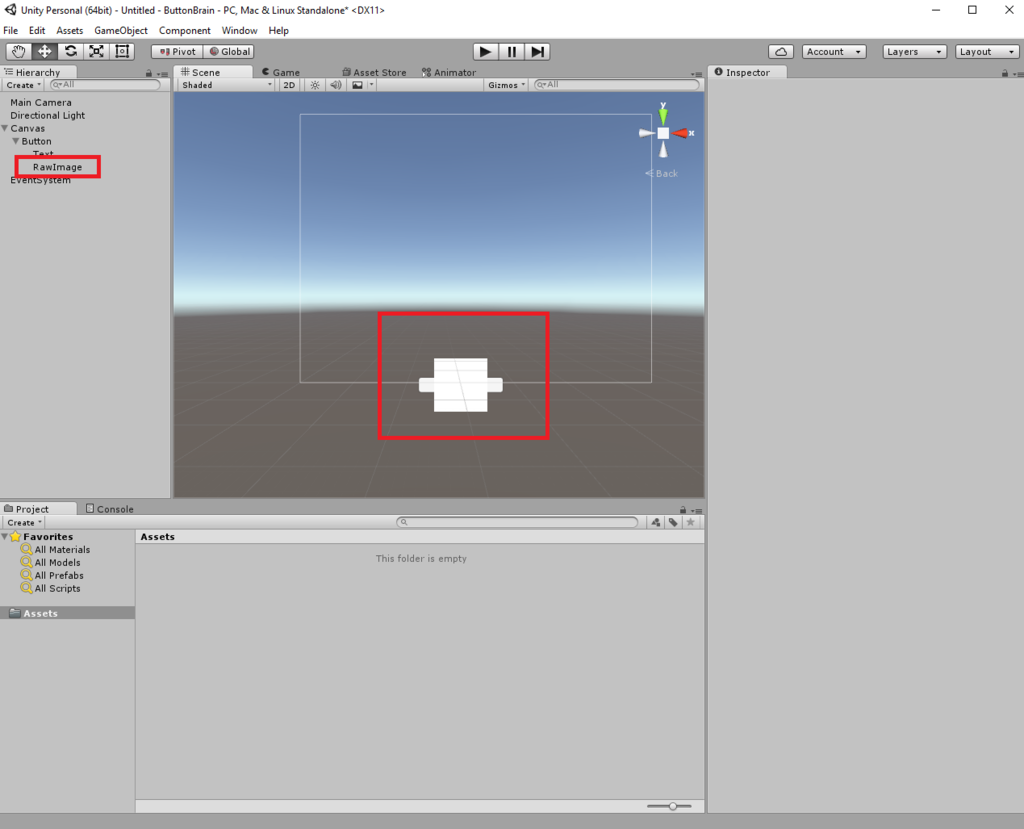
1. RawImageオブジェクトの作成

RawImageオブジェクトが作成されると以下のように真っ白な画像がボタンの上に表示されます
2. 画像を張り付ける
まずは画像を用意します。今回は適当に検索してきた以下の画像を利用します

この画像をAssets以下に配置します

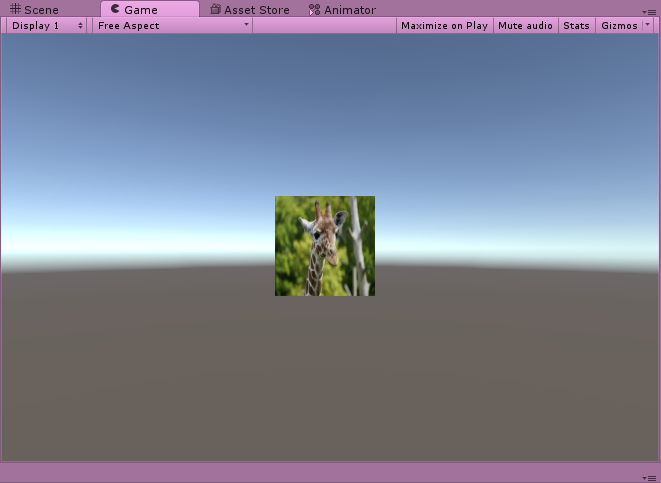
次にD&DでRawImageのTextureの項目へ上記の画像を割り当てます
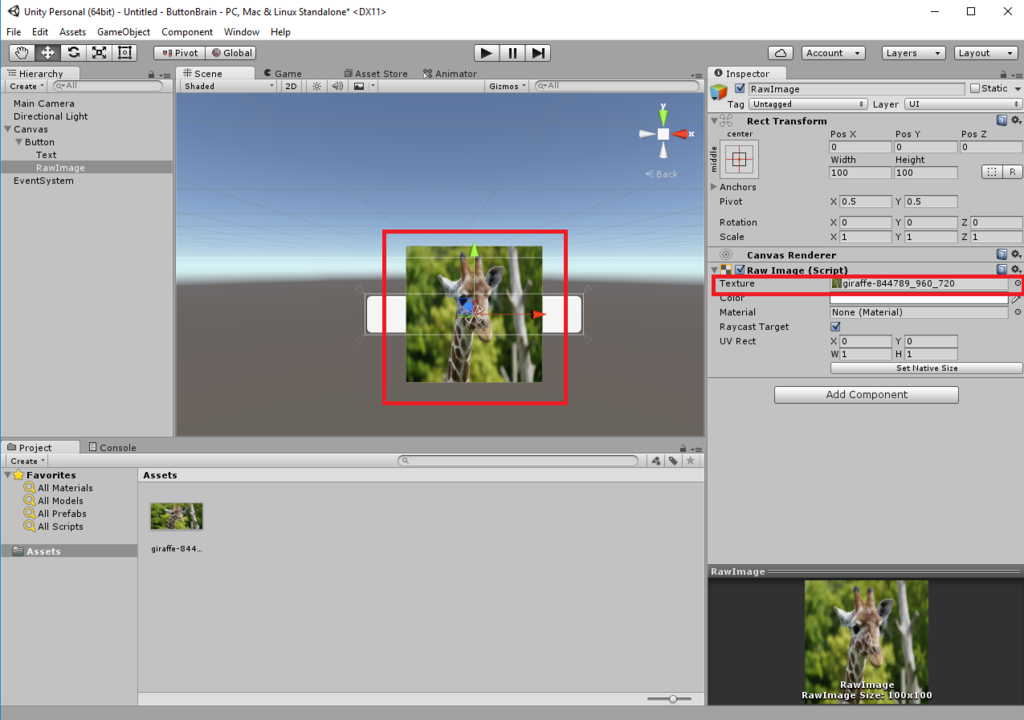
そうするとキリンの画像が画面に表示されます
gangliaでGPUの情報を監視しようとしてえらい苦労した話
gangliaでGPGPUサーバのデータを監視しようとしたのですが、はまりポイントが多数あって苦労しました
Gangliaのインストール
1. Master server
### install packages
sudo apt-get install ganglia-monitor rrdtool gmetad ganglia-webfrontend
ps -eaf | egrep "gmon|gmeta"
  ganglia  14057     1  0 06:05 ?        00:00:00 /usr/sbin/gmond --pid-file=/var/run/ganglia-monitor.pid
  nobody   14071     1  0 06:05 ?        00:00:00 /usr/sbin/gmetad --pid-file=/var/run/gmetad.pid
ss -lntp | egrep "86[0-9]{2}"
  LISTEN     0      5                         *:8649                     *:*
  LISTEN     0      10                        *:8651                     *:*
  LISTEN     0      10                        *:8652                     *:*

### setting configuration(gmetad)
sudo cp -ip /etc/ganglia-webfrontend/apache.conf /etc/apache2/sites-enabled/ganglia.conf
sudo cp -ip /etc/ganglia/gmetad.conf{,.org}
sudo vi /etc/ganglia/gmetad.conf
=================================================
 44 #data_source "my cluster" localhost
 45 data_source "好きなクラスター名" 60 localhost
=================================================

### setting configuration(gmond)
sudo cp -ip /etc/ganglia/gmond.conf{,.org}
sudo vi /etc/ganglia/gmond.conf
=================================================
 20 cluster {
 21   name = "設定したクラスター名"
 22   owner = "unspecified"
 23   latlong = "unspecified"
 24   url = "unspecified"
 25 }
・
・
 34 udp_send_channel {
 35   #mcast_join = 239.2.11.71 # => commentout
 36   host = localhost           # => add
 37   port = 8649
 38   ttl = 1
 39 }
.
.
 42 udp_recv_channel {
 43   #mcast_join = 239.2.11.71  # => commentout
 44   port = 8649
 45   #bind = 239.2.11.71        # => commentout
 46 }
=================================================

### gmond & gmetad & apache restart
sudo service ganglia-monitor restart
sudo service gmetad restart
sudo service apache2 restart
- はまりポイント1:スクリプトで全部同時に起動しようとしたらうまく起動しなかった
- 手動でやったりsleepをかませたらうまくいった
2. Client server
### install package
sudo apt-get install ganglia-monitor
ps -eaf | grep gmond
  ganglia   1952     1 99 04:26 ?        00:02:21 /usr/sbin/gmond --pid-file=/var/run/ganglia-monitor.p

### setting configuration(gmond)
sudo cp -ip /etc/ganglia/gmond.conf{,.org}
sudo vi /etc/ganglia/gmond.conf
===============================================================================
  .
  .
 10   deaf = yes  # => change to yes
  .
  .
 20 cluster {
 21   name = "設定したクラスター名"  # => Change name
 22   owner = "unspecified"
 23   latlong = "unspecified"
 24   url = "unspecified"
 25 }
  .
  .
 34 udp_send_channel {
 35   # mcast_join = 239.2.11.71 # commment out
 36   host = 192.168.33.11       # add(master serverIP)
 37   port = 8649
 38   ttl = 1
 39 }
 .
 .
 41 /* You can specify as many udp_recv_channels as you like as well. */
 42 #udp_recv_channel {          # comment out
 43 #  mcast_join = 239.2.11.71  # comment out
 44 #  port = 8649               # comment out
 45 #  bind = 239.2.11.71        # comment out
 46 #}                           # comment out
===============================================================================

### ganglia monitor restart
sudo /etc/init.d/ganglia-monitor restart
この時点でGangliaのViewが表示されて、基本的な情報の取得ができるようになる
GPUのMetricsの設定
1. Client server
### modify gmond.conf
sudo vi /etc/ganglia/gmond.conf
======================================================================
 59 modules {・
・
・
 91   module {                                          # add
 92     name = "python_module"                          # add
 93     path = "/usr/lib/ganglia/modpython.so"          # add
 94     params = "/usr/lib/ganglia/python_modules/"     # add
 95   }                                                 # add
 96 }
 97
 98 include ('/etc/ganglia/conf.d/*.conf')
 99 include ('/etc/ganglia/conf.d/*.pyconf')            # add
======================================================================

### make dir
sudo mkdir /etc/ganglia/conf.d
sudo mkdir /usr/lib/ganglia/python_modules

### prepare python module
cd /usr/local/src
git clone https://github.com/ganglia/gmond_python_modules.git
cd ${download directory}/gpu/nvidia
wget https://pypi.python.org/packages/72/31/378ca145e919ca415641a0f17f2669fa98c482a81f1f8fdfb72b1f9dbb37/nvidia-ml-py-7.352.0.tar.gz
tar xvfpz nvidia-ml-py-7.352.0.tar.gz
ls -l
  drwxr-xr-x 2 root     root      4096 May 10 16:26 conf.d
  -rw-r--r-- 1 root     root      5093 May 10 16:26 ganglia_web.patch
  drwxr-xr-x 2 root     root      4096 May 10 16:26 graph.d
  drwxr-xr-x 3 root     root      4096 May 10 16:26 nvidia-ml-py-3.295.00
  drwxrwxr-x 3 root     root      4096 May 10 16:27 nvidia-ml-py-7.352.0
  -rw-r--r-- 1 root     root     20524 Apr 23 23:13 nvidia-ml-py-7.352.0.tar.gz
  drwxr-xr-x 2 root     root      4096 May 10 16:26 python_modules
  -rw-r--r-- 1 root     root      1661 May 10 16:26 README

cd nvidia-ml-py-7.352.0
sudo python setup.py install


cd ../
sudo cp -ip python_modules/nvidia.py /usr/lib/ganglia/python_modules/.
sudo cp -ip conf.d/nvidia.pyconf /etc/ganglia/conf.d/.

### restart
sudo service ganglia-monitor restart
- はまりポイント2:python_moduleの設定でpathは相対でいいって書いてあるドキュメントがあったけど絶対パスじゃないと動かなかった
- はまりポイント3:git cloneで取得できるgmond_python_modules内のnvidiaパッケージは古くて(nvida-ml-py3.295.00)、setup.pyを実行すると使えないパッケージがinstallされてしまう
- 対応としてnvidia-ml-py-7.352.0を直接取得する
- はまりポイント4:しかし逆にnvidia-ml-py-7.352.0の方のpython_moduleファイルは使用できず、confファイルは存在すらしないため、この二つはnvida-ml-py3.295.00の方のものを使用しなければいけない
- はまりポイント5:一度nvida-ml-py3.295.00の方のsetupスクリプトを使用すると手動で関連ファイルを削除したりPythonのload_pathを戻さなければならない
2. master server
cd /usr/local/src
git clone https://github.com/ganglia/gmond_python_modules.git
cd ${download directory}
cd gpu/nvidia/graph.d
ls -l
  total 24
  -rw-r--r-- 1 root root  596 Mar 18 09:12 gpu_common.php
  -rw-r--r-- 1 root root 2139 Mar 18 09:12 gpu_graphics_clock_report.php
  -rw-r--r-- 1 root root 2143 Mar 18 09:12 gpu_mem_clock_report.php
  -rw-r--r-- 1 root root 1526 Mar 18 09:12 gpu_power_usage_report.php
  -rw-r--r-- 1 root root 1586 Mar 18 09:12 gpu_power_violation_report.php
  -rw-r--r-- 1 root root 2169 Mar 18 09:12 gpu_sm_clock_report.php

sudo cp -ip * /usr/share/ganglia-webfrontend/graph.d

sudo service apache2 restart
Make view system
1. master server
cd /var/lib/ganglia-web/conf/
vi view_gpu1.json
===========================================================
### 環境にあわせて作成
===========================================================
- このviewファイルの作成の仕方のドキュメントがとても少ない
他はまったポイント
nvidia.pyがデータを取得できない
Failed to build descriptor : gpu0_ecc_db_error : Not Supported
Failed to build descriptor : gpu0_ecc_sb_error : Not Supported
Failed to build descriptor : gpu0_power_violation_report : global name 'nvmlDeviceGetViolationStatus' is not defined
Failed to build descriptor : gpu0_bar1_memory : global name 'nvmlDeviceGetBAR1MemoryInfo' is not defined
Failed to build descriptor : gpu0_bar1_max_memory : global name 'nvmlDeviceGetBAR1MemoryInfo' is not defined
Failed to build descriptor : gpu0_shutdown_temp : global name 'nvmlDeviceGetTemperatureThreshold' is not defined
Failed to build descriptor : gpu0_slowdown_temp : global name 'nvmlDeviceGetTemperatureThreshold' is not defined
Failed to build descriptor : gpu0_encoder_util : global name 'nvmlDeviceGetEncoderUtilization' is not defined
Failed to build descriptor : gpu0_decoder_util : global name 'nvmlDeviceGetDecoderUtilization' is not defined
これは最新版使うことで解決
tpl file
$ sudo patch -p0 < /usr/local/src/gmond_python_modules/gpu/nvidia/ganglia_web.patch
patching file host_view.php
Hunk #1 FAILED at 17.
Hunk #2 FAILED at 37.
Hunk #3 FAILED at 144.
Hunk #4 FAILED at 153.
Hunk #5 FAILED at 169.
5 out of 5 hunks FAILED -- saving rejects to file host_view.php.rej
patching file templates/default/host_view.tpl
Hunk #1 FAILED at 80.
Hunk #2 FAILED at 89.
2 out of 2 hunks FAILED -- saving rejects to file templates/default/host_view.tpl.rej
動かない
現在のversionのgangliaでは不要とのコメントもあったのでそもそもいらないTool?
view ファイルのhost指定
  1 {
  2   "view_name": "GPU1",
  3   "view_type": "standard",
  4   "items": [
  5     {
  6       "aggregate_graph": "true",
  7       "host_regex": [ { "regex":"192.168.33.11" } ],
7行目のように監視対象のHostをIPで指定していたのだが、いつからのversionかHost名で指定しないと動かなくなった
host名で指定したら問題なく動くように戻った

