[iOS] SwiftによるiPhoneアプリ開発入門(超初歩)その5 -値の引き継ぎとタプル-
画面遷移先に値を引き継ぐ方法とタプルというデータ構造について説明します。
1. まずはview controllerを二つ用意し、
- 1ページ目にボタンを二つ
- 2ページ目にimageViewとLabel, 戻るボタン
を配置し、1ページ目のボタンから2ページ目へ方式「present modally」で画面遷移を作成します

2. それぞれのボタンをクリックし、右の設定画面でTagの数値を設定します。
この時、最初のボタンを0、二つ目のボタンを1にします。

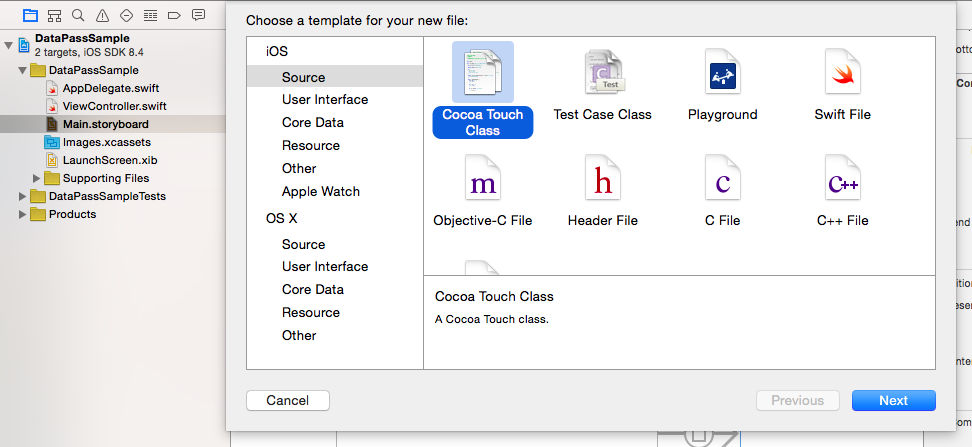
3. 2ページ目のViewControllerファイルを作成します。

名前は適当に「SecondViewController.swift」にします。

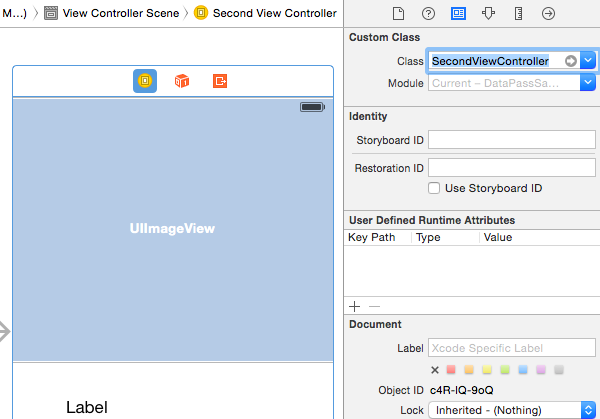
4. Story boardに戻り、2ページ目のviewcontrolleをクリックし、右側の設定画面で、連携させるViewControllerとしてSecondViewControllerを指定します。

5. 遷移先の画面で、まずは値を受け取る変数を用意する。
class SecondViewController: UIViewController {

    var index: Int = 0  // この1行を追加

    override func viewDidLoad() {
        super.viewDidLoad()

        // Do any additional setup after loading the view.
    }
5. 2ページ目に表示する画像を2枚用意します。
(今回は"berry01.jpeg"と"berry02.jpeg")

6. この画像と説明文の情報をタプル形式で用意します。
タプル
let \(タプルの変数名): [(変数名1: 変数の型, 変数名2: 変数の型)] = [
    ("情報1", "情報2"),
    ("情報3", "情報4")
]
↓
実際に格納します
let images: [(fileName: String, message: String)] = [
    ("berry01.jpeg", "ラズベリーです"),
    ("berry02.jpeg", "ストロベリーです")
]
7. Storyboard上2ページ目のViewControllerとLabelをSecondViewControllerにoutlet接続する
    @IBOutlet weak var fruitImage: UIImageView!
    @IBOutlet weak var explanation: UILabel!
8. 次に、実際に値が受け渡されたと仮定して続きの処理を書く
    override func viewDidLoad() {
        super.viewDidLoad()

        fruitImage.image = UIImage(named: images[index].fileName)
        explanation.text = images[index].message
    }
9. 遷移元の画面で画面を送る
- ここがAndroidと大きく違う点なのだが、Swiftでは値の受け取り先で入れ物として宣言した変数を、値を送る側のPageでそのまま呼び出せる。なので、直接その変数に値代入することで値を送ることになる。
    override func prepareForSegue(segue: UIStoryboardSegue, sender: AnyObject?) {
        let dest = segue.destinationViewController as! SecondViewController

        dest.index = sender?.tag ?? 0
    }
- 「as!」は以前のversionでは「as?」だったが最新版では!に変更
- 「optional値 ?? デフォルト値」 でもしoptionalから値が取得できた場合はその値を利用、できなかったらデフォルト値を利用する
- (if -let文でもいい)
10. 最後に戻るボタンの設定をして完了。
ファイル全体
ViewController.swift
import UIKit

class ViewController: UIViewController {

    override func viewDidLoad() {
        super.viewDidLoad()
        // Do any additional setup after loading the view, typically from a nib.
    }

    override func didReceiveMemoryWarning() {
        super.didReceiveMemoryWarning()
        // Dispose of any resources that can be recreated.
    }

    override func prepareForSegue(segue: UIStoryboardSegue, sender: AnyObject?) {
        let dest = segue.destinationViewController as! SecondViewController

        dest.index = sender?.tag ?? 0
    }

    @IBAction func unwind(serder: UIStoryboardSegue) {

    }
}
SecondViewController.swift
import UIKit

class SecondViewController: UIViewController {

    var index: Int = 0

    @IBOutlet weak var fruitImage: UIImageView!

    @IBOutlet weak var explanation: UILabel!

    let images: [(fileName: String, message: String)] = [
        ("berry01.jpeg", "ラズベリーです"),
        ("berry02.jpeg", "ストロベリーです")
    ]

    override func viewDidLoad() {
        super.viewDidLoad()

        fruitImage.image = UIImage(named: images[index].fileName)
        explanation.text = images[index].message
    }

    override func didReceiveMemoryWarning() {
        super.didReceiveMemoryWarning()
        // Dispose of any resources that can be recreated.
    }

}