Rails(ActiveRecord)に関して
Active Recordの値の取り扱いに関して
こんなレコードがあるとして
mysql> select id,name from users;
+----+---------+
| id | name    |
+----+---------+
|  1 | foo     |
|  2 | bar     |
|  3 | fizz    |
+----+---------+
これをActiveRecord経由で取得した場合どういうデータ形式になったりメソッドが使えるかという話
find_byだと
Userインスタンスが返ってくる
> User.select(:id, :name).find_by(id: 1)
=> #<User id: 1, name: "foo">
それぞれの値の取得方法
> user = User.select(:id, :name).find_by(id: 1)
=> #<User id: 1, name: "foo">

> user.id
=> 1
> user.name
=> "foo"

> user[:id]
=> 1
> user[:name]
=> "foo"
to_aメソッドやeachは使えない
> User.select(:id, :name).find_by(id: 1).to_a
Traceback (most recent call last):
        9: from script/rails:8:in `<main>'
        8: from script/rails:8:in `require'
        .
        .
        .
whereの場合
ActiveRecord::Relationが返ってくる
# ActiveRecord::Relationとして返ってくる
> User.select(:id, :name).where(id: [1,3])
=> #<ActiveRecord::Relation [#<User id: 1, name: "foo">, #<User id: 3, name: "fizz">]>
> User.select(:id, :name).where(id: [1,3]).class
=> User::ActiveRecord_Relation

# to_aにすると配列として返ってくる
> User.select(:id, :name).where(id: [1,3]).to_a
=> [#<User id: 1, name: "foo">, #<User id: 3, name: "fizz">]
irb(main):315:0> User.select(:id, :name).where(id: [1,3]).to_a.class
=> Array
それぞれの値の取得方法
# 配列のように指定ができる
> User.select(:id, :name).where(id: [1,3])[0]
=> #<User id: 1, name: "foo">
> User.select(:id, :name).where(id: [1,3])[1]
=> #<User id: 3, name: "fizz">

# その上で値が取得できる
> User.select(:id, :name).where(id: [1,3])[0].name
=> "foo"
> User.select(:id, :name).where(id: [1,3])[1].name
=> "fizz"
ActiveRecord::Relationでも配列でもeachが使える(取得できるのはuserインスタンス)
# ActiveRecord::Relation
> User.select(:id, :name).where(id: [1,3]).each do |user|
>     puts user
> end
#<User:0x00005560a6bd4d20>
#<User:0x00005560a6bd46b8>

# Array
> User.select(:id, :name).where(id: [1,3]).to_a.each do |user|
>     puts user
> end
#<User:0x00005560a6b3aef0>
#<User:0x00005560a6b3a6a8>
ubuntu16.04にrbenvでrubyをインストールする
# library install and update
sudo apt-get update
cd
sudo apt-get install git build-essential libssl-dev libreadline-dev

vi ~/.profile
### 以下を末尾に追加 ###
export PATH="$HOME/.rbenv/bin:$PATH"
eval "$(rbenv init -)"
### ここまで ###

source ~/.profile

# installできるversionのチェック
rbenv install --list

# install
rbenv install 2.5.1
rbenv rehash

# globalへの設定&確認
rbenv global 2.5.1
ruby -v
AWS EC2で”JavaScript heap out of memory”エラーが出たら
AWS EC2で”JavaScript heap out of memory”エラーが出たときの対処法です
主にt2.microとかメモリ容量の小さいインスタンスでnuxtとかnode使ってると出現する
こんなエラー
<--- Last few GCs --->

[5746:0x42f2e10]    11947 ms: Mark-sweep 101.0 (114.6) -> 100.2 (113.6) MB, 140.1 / 0.0 ms  (+ 0.3 ms in 1 steps since start of marking, biggest step 0.3 ms, walltime since start of marking 182 ms) (average mu = 0.294, current mu = 0.434) low memory notif[5746:0x42f2e10]    12099 ms: Mark-sweep 100.2 (113.6) -> 100.2 (113.6) MB, 152.0 / 0.0 ms  (average mu = 0.168, current mu = 0.000) low memory notification GC in old space requested

<--- JS stacktrace --->

==== JS stack trace =========================================

Security context: 0x1098ebb9e549 <JSObject>
    0: builtin exit frame: new ArrayBuffer(aka ArrayBuffer)(this=0x1ff267182801 <the_hole>,0x3c9d355d9001 <Number 6.41975e+06>,0x1ff267182801 <the_hole>)

    1: ConstructFrame [pc: 0x3e29d418d145]
    2: StubFrame [pc: 0x3e29d420b900]
    3: createUnsafeArrayBuffer(aka createUnsafeArrayBuffer) [0x3bbd5485d531] [buffer.js:119] [bytecode=0x365108798601 offset=25](this=0x1ff2671826f1 <undefined>,s...

FATAL ERROR: Committing semi space failed. Allocation failed - JavaScript heap out of memory
 1: 0x8c02c0 node::Abort() [node]
 2: 0x8c030c  [node]
 3: 0xad15de v8::Utils::ReportOOMFailure(v8::internal::Isolate*, char const*, bool) [node]
 4: 0xad1814 v8::internal::V8::FatalProcessOutOfMemory(v8::internal::Isolate*, char const*, bool) [node]
 5: 0xebe752  [node]
 6: 0xecb0f2  [node]
 7: 0xecb2b4 v8::internal::Heap::CollectGarbage(v8::internal::AllocationSpace, v8::internal::GarbageCollectionReason, v8::GCCallbackFlags) [node]
 8: 0xecc7aa v8::internal::Heap::CollectAllAvailableGarbage(v8::internal::GarbageCollectionReason) [node]
 9: 0xae6cc5 v8::Isolate::LowMemoryNotification() [node]
10: 0x8bfdad node::ArrayBufferAllocator::Allocate(unsigned long) [node]
11: 0xfd88e3 v8::internal::JSArrayBuffer::SetupAllocatingData(v8::internal::Handle<v8::internal::JSArrayBuffer>, v8::internal::Isolate*, unsigned long, bool, v8::internal::SharedFlag) [node]
12: 0xb64514  [node]
13: 0xb664b3 v8::internal::Builtin_ArrayBufferConstructor(int, v8::internal::Object**, v8::internal::Isolate*) [node]
14: 0x3e29d41dc17d
対処法
sudo su
dd if=/dev/zero of=/swapfile bs=1M count=1024
chmod 600 /swapfile
mkswap /swapfile
swapon /swapfile
node.jsのインストール方法
# install ndenv
cd /usr/local/
git clone https://github.com/riywo/ndenv.git
chmod -R g+rwxXs /usr/local/ndenv/
mkdir /usr/local/ndenv/plugins
cd /usr/local/ndenv/plugins
git clone https://github.com/riywo/node-build.git
cat << "EOF" > /etc/profile.d/ndenv.sh
export NDENV_ROOT=/usr/local/ndenv
export PATH="$NDENV_ROOT/bin:$PATH"
eval "$(ndenv init -)"
EOF
source /etc/profile.d/ndenv.sh

# install node
ndenv install ${NODE_VERSION}
ndenv global ${NODE_VERSION}
ndenv rehash
Nuxt.jsで画像をwebpで圧縮する
library install
npm install --save gulp-webp
gulpfile.js
vi gulpfile.js
const webp = require('gulp-webp')

gulp.task('webp', function() {
  return gulp.src("./precompile/img/**/*.{svg,gif,png,jpg,jpeg}")
             .pipe(webp())
             .pipe(gulp.dest("./assets/img/"));
});
実行コマンド
gulp webp
流れとしてはprecompile/imgという名前の画像ファイル置き場を作成し、ここにjpgやpngやらの画像を配置する
gulp webpコマンドで上記の画像ファイルをwebpファイルに変換してassets/img以下に配置する
(その後は通常通りnuxt generateでdist以下に画像ファイルが配置される)
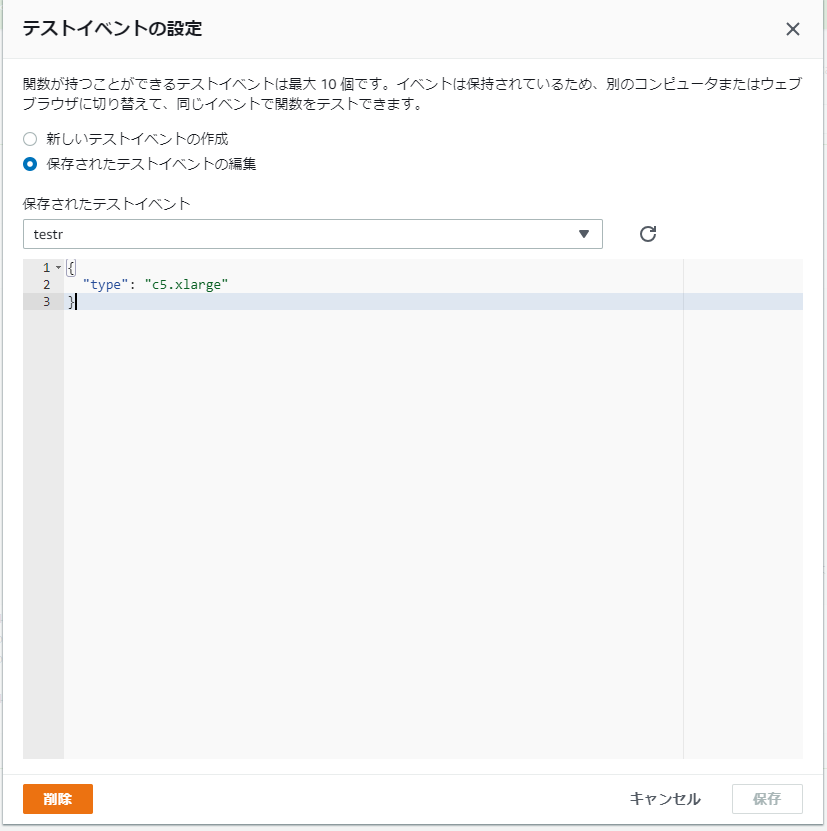
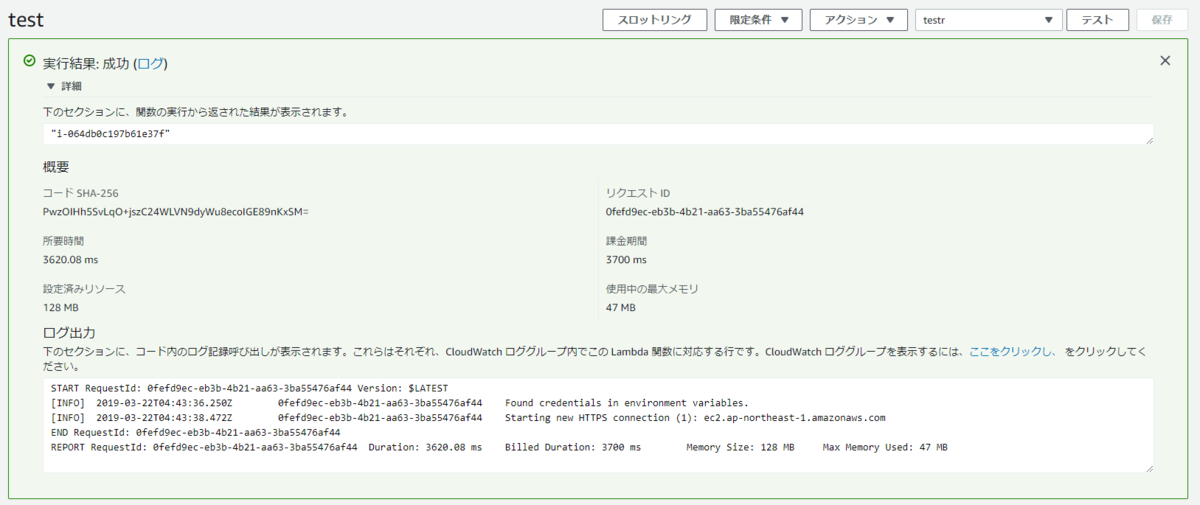
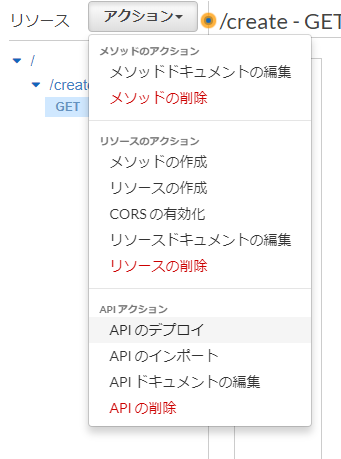
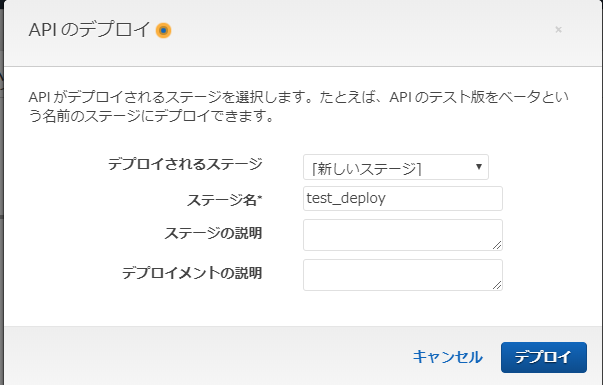
AWS lambdaとAPI GatewayとEC2を使って特定のURLにアクセスするだけでインスタンスを作成できるようにする
Lambdaの設定
まずは実際の処理部分をLambdaで設定します
関数の作成
関数の作成を選択して必要な情報を入力していきます。
今回ランタイムはPython2.7を選択しています。
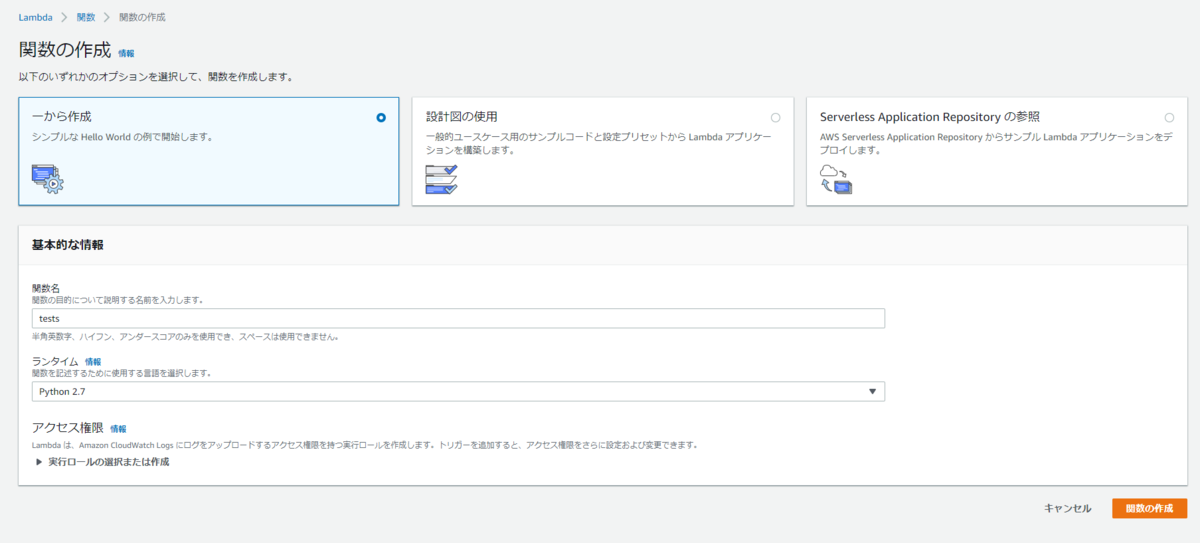
右下の関数の作成を選択すると以下のような画面が表示されます

下にゆくと以下のように処理を入力するエリアが出てきます

import boto3
from botocore.exceptions import ClientError
import json
import logging
import os
import datetime

AMIID=os.environ['AMIID']

logger = logging.getLogger()
logger.setLevel(logging.INFO)

def create_userdata():
    str="""#!/bin/sh
date > /tmp/userdate.log
yum -y update
${PROCESS WHICH YOU WANNA DO}
echo "Finished UserData" > /tmp/userdata.log
"""

    return str

def create_name():
    now = datetime.datetime.now()
    return 'instance_from_lambda_' + now.strftime('%Y/%m/%d %H:%M') + '(UTC)'

def lambda_handler(event, context):
    ret={}

    ec2 = boto3.client('ec2',region_name='ap-northeast-1')
    try:
        res = ec2.run_instances(
                                ImageId=AMIID,
                                InstanceType=event['type'],
                                MinCount=1,
                                MaxCount=1,
                                InstanceInitiatedShutdownBehavior='terminate',
                                IamInstanceProfile={'Name': 'your IAM'},
                                NetworkInterfaces=[{
                                            'DeviceIndex': 0,
                                            'SubnetId' : 'your subnet id',
                                            'Groups': ["your security group"],
                                            'AssociatePublicIpAddress': True
                                        }],
                                TagSpecifications=[
                                            {
                                                'ResourceType':'instance',
                                                'Tags':[
                                                    {
                                                    'Key':'Name',
                                                    'Value':create_name()
                                                    }
                                                ]
                                            }
                                        ],
                                UserData=create_userdata()
                                )

        return res['Instances'][0]['InstanceId']
    except ClientError as e:
        ret['code'] = e.response['Error']['Code']
        ret['message'] = e.response['Error']['Message']

        raise json.dumps(ret)
- 今回はAMIIDは以下のように環境変数で設定します

次にタイムアウトの時間を3秒から15秒に伸ばしておきます
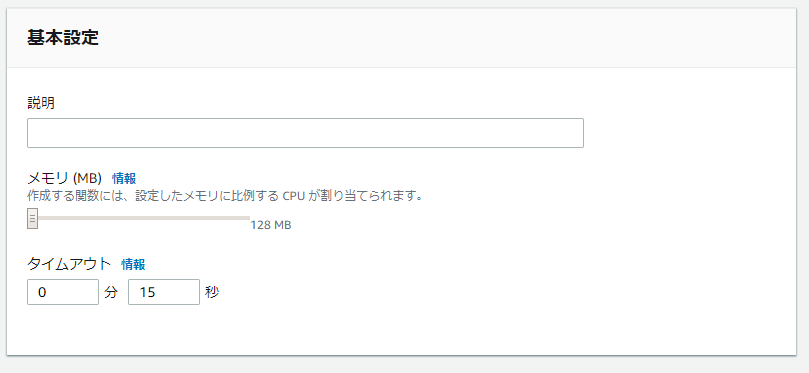
最後に右上の保存を押して設定を保存します
API Gatewayの作成
次に上記のLambdaの処理を呼び出すAPIを作成します
リソースの作成
API Gateway > APIの作成を選択し、必要な項目を入力してAPIの作成を選択していきます

以下のような画面になります

アクションからリソースの作成を選択し、必要な情報を入力します

次にステージ変数としてインスタンスタイプを送れるようにします
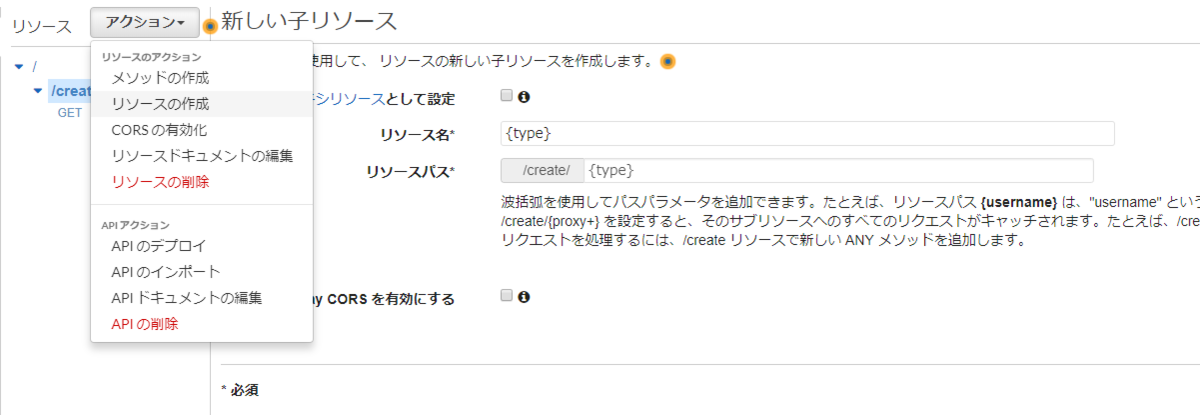
次にアクションからメソッドの作成を選択し、ドロップダウンでGETを選択します。
選択すると具体的な設定の入力項目が出現するので、今回は統合タイプは「Lambda関数」、Lambda関数には先ほど作成した関数の「test」を入力します

次に統合リクエストのマッピングテンプレートから、パラメータの設定を行います。

{
  "type": "$input.params('type')"
}
