raspberryPi3のIPを固定する方法(static ip)
raspberryPiは通常自動でIPをアサインしてくれますが、それでは困る場合などに固定IPアドレスにする方法です。
raspbianのversion upに伴い、raspberryPi2の時とは方法が変わっているようです。
ちなみにversionは8.0です
$ cat /etc/debian_version
8.0
/etc/network/interfacesの確認
$ cat /etc/network/interfaces
# interfaces(5) file used by ifup(8) and ifdown(8)

# Please note that this file is written to be used with dhcpcd
# For static IP, consult /etc/dhcpcd.conf and 'man dhcpcd.conf'

# Include files from /etc/network/interfaces.d:
source-directory /etc/network/interfaces.d

auto lo
iface lo inet loopback

iface eth0 inet manual

allow-hotplug wlan0
iface wlan0 inet manual
    wpa-conf /etc/wpa_supplicant/wpa_supplicant.conf

allow-hotplug wlan1
iface wlan1 inet manual
    wpa-conf /etc/wpa_supplicant/wpa_supplicant.conf
上のほうのコメントを見ると、staticIPにするにはdhcpcd.confを編集すればよいことがわかります。
とりあえず書かれている通りにmanを見ます
$ man dhcpcd.conf
     static value
             Configures a static value.  If you set ip_address then dhcpcd will not attempt to obtain a lease
             and just use the value for the address with an infinite lease time.

             Here is an example which configures a static address, routes and dns.
                   interface eth0
                   static ip_address=192.168.0.10/24
                   static routers=192.168.0.1
                   static domain_name_servers=192.168.0.1

             Here is an example for PPP which gives the destination a default route.  It uses the special desti-
             nation keyword to insert the destination address into the value.
                   interface ppp0
                   static ip_address=
                   destination routers
staticで検索すると上記のような記入例が出てくるので、自分のIPに変更して実際に書き込みます
/etc/dhcpcd.confの編集
$ vi /etc/dhcpcd.conf
### ファイル末尾に追加
interface eth0
static ip_address=192.168.0.10/24
static routers=192.168.0.1
static domain_name_servers=192.168.0.1

### wifi(wlan0)の場合は
interface wlan0
.
.
.
これで完了です。
後はraspberryPiを再起動して設定したIPでアクセスできることが確認できればOKです。
raspberryPi3へWiringPiGPIOを設定する手順
GPIO:General Purpose Input/Output
$ git clone git://git.drogon.net/wiringPi
  Cloning into 'wiringPi'...
  .
  .
  .
  Checking connectivity... done.

$ ls -l
  total 4
  drwxr-xr-x 10 pi pi 4096 Nov 29 15:10 wiringPi

$ cd wiringPi/

./build
  wiringPi Build script
  .
  .
  .
  All Done.
  .
  .
  .

$ gpio -v
  gpio version: 2.32
  Copyright (c) 2012-2015 Gordon Henderson
  This is free software with ABSOLUTELY NO WARRANTY.
  For details type: gpio -warranty

  Raspberry Pi Details:
    Type: Pi 3, Revision: 02, Memory: 1024MB, Maker: Embest
    * Device tree is enabled.
    * This Raspberry Pi supports user-level GPIO access.
      -> See the man-page for more details
      -> ie. export WIRINGPI_GPIOMEM=1
Rubyでシリアル通信する方法(serialport gem)
Rubyでシリアル通信する場合は、serialport gemを使うと簡単にできます。
install serial port
$ gem install serialport
How to Use
require 'serialport'

sp = SerialPort.new('/dev/ttyS0', 115200, 8, 1, 0) # device, rate, data, stop, parity

# 送信
sp.puts("foobar")

# 受信
sp.gets
sp.readline.chomp.strip # こっちだと空白とか余分な情報をそぎ落としてくれる
sinatraでhashデータをJSONとして返す方法
方法
require 'json'
return #{hash}.to_json
例
require 'sinatra'
require 'json'

get '/top' do
  hash = {
    "key1" => 1,
    "key2" => 2,
    "key3" => 3,
  }

  return hash.to_json
end
raspberryPi3とWindowsPCでシリアル通信する方法
環境
RaspberryPi3
WindowsPC
USB-serial変換ケーブル
FTDI USB・シリアル変換ケーブル(3.3V): 半導体 秋月電子通商 電子部品 ネット通販
接続
raspberryPi側
調べると色々出てきますが、変換ケーブルのGND, TXD, RXDをRaspberryPiのGPIOに差し込みます
ここで注意が必要なのが、送信と受信を対にするために以下のように接続します

PC側
PC側は普通にUSBに差すだけです。
差したあとにデバイスマネージャーで認識されているか確認しましょう

設定
raspberryPi側
調べていくと、raspberryPiのシリアル通信ポートは既に他の用途で使われているようで、これを使えるようにする方法がRaspberryPiのモデルやRaspbianのversionによって様々で、ちょっと苦戦しました。
最終的に私がうまくいった方法は・・・
1. raspi-configでserial通信を有効化する
2. /boot/config.txtへ追記
$ sudo vi /boot/config.txt
  enable_uart=1 # 末尾へ追記する
3. getty無効化
sudo systemctl stop serial-getty@ttyS0.service
sudo systemctl disable serial-getty@ttyS0.service
4. 再起動する
通信(確認)
PC側 ⇒ raspberryPi
今回はターミナルとしてteratermを利用しました
接続方法を選択する際にTCP/IPではなくシリアルを選択します
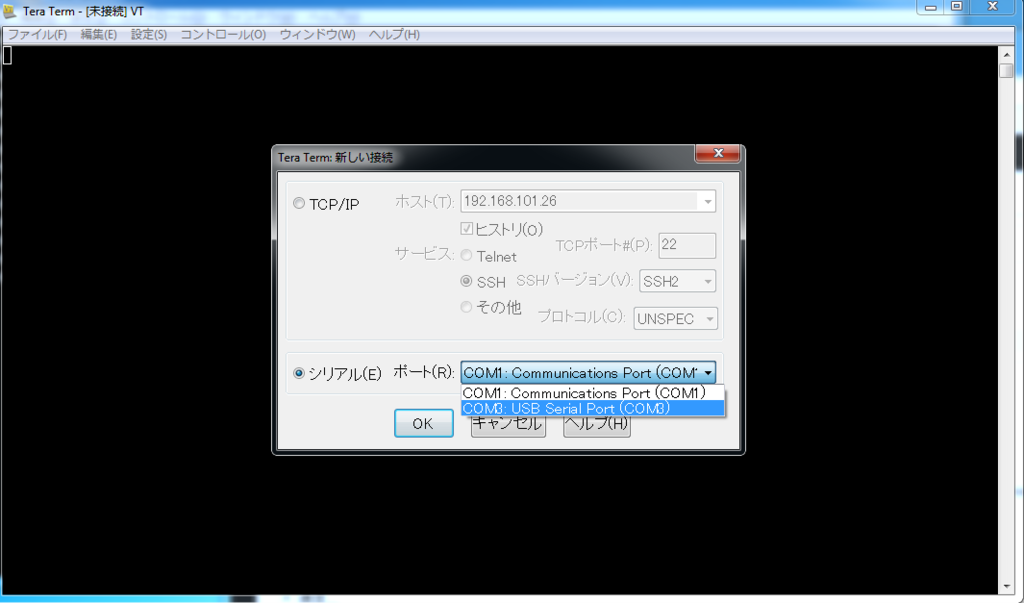
raspberryPiのボーレートは115200なので、「設定 > シリアルポート」から、ボーレートの変更を行います

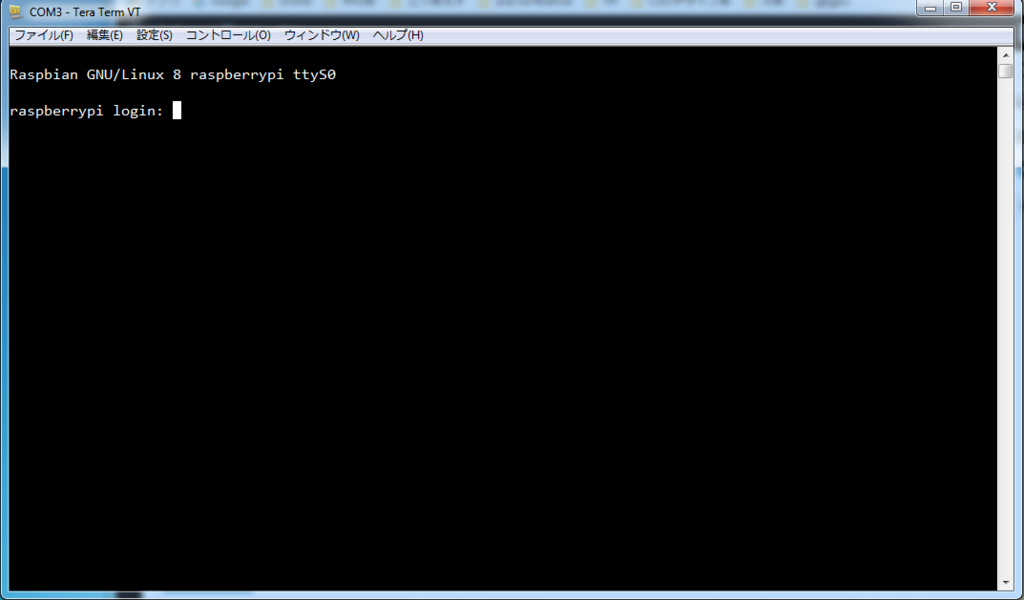
変更後にエンターキーを一度押すとログイン画面が表示されます。
raspberryPi ⇒ PC側
色々方法はあるようですが、今回はscreenを利用して確認をします
screen /dev/ttyS0 115200
これでscreen経由で入力した情報がシリアル側へ表示されればOKです

おまけ
/boot/cmdline.txtの編集
このままだとシリアル通信側に全てコンソール情報が常に表示されてしまうので、cmdline.txtファイルを編集することでそれを防ぐことができます
$ sudo vi /boot/cmdline.txt
  dwc_otg.lpm_enable=0 console=tty1 console=serial0,115200 root=/dev/mmcblk0p2 rootfstype=ext4 elevator=deadline fsck.repair=yes rootwait
  # console=serial0, 115200を削除します
mjpg-streamerでraspberryPiのカメラからストリーミングをする方法
以下のサイトを参考にさせて頂いてraspberryPiのカメラでストリーミングを行えるようにしました
neuralassemblyのメモ: Raspberry Pi用カメラモジュールおよび赤外線カメラPi NoIRの映像をandroidで表示してみた
1. カメラの接続
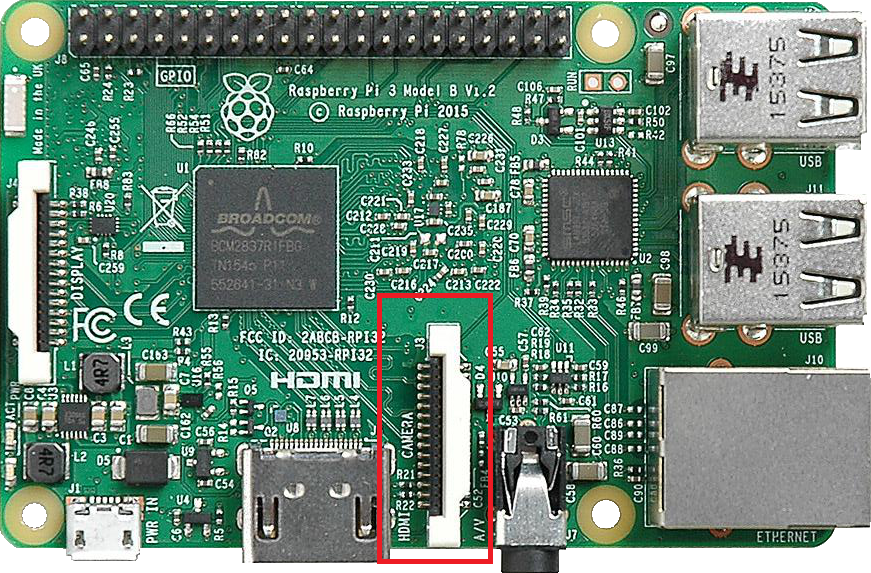
まずは何はともあれカメラを接続します。
場所は基盤に「CAMERA」と書いてあるのですぐわかると思います。
2. cameraの有効化
カメラは接続しただけでは有効化されていないので、raspi-configから有効化します
sudo raspi-config
以下のような設定用の画面が出てくるので、6の[Enable Camera]を選択します
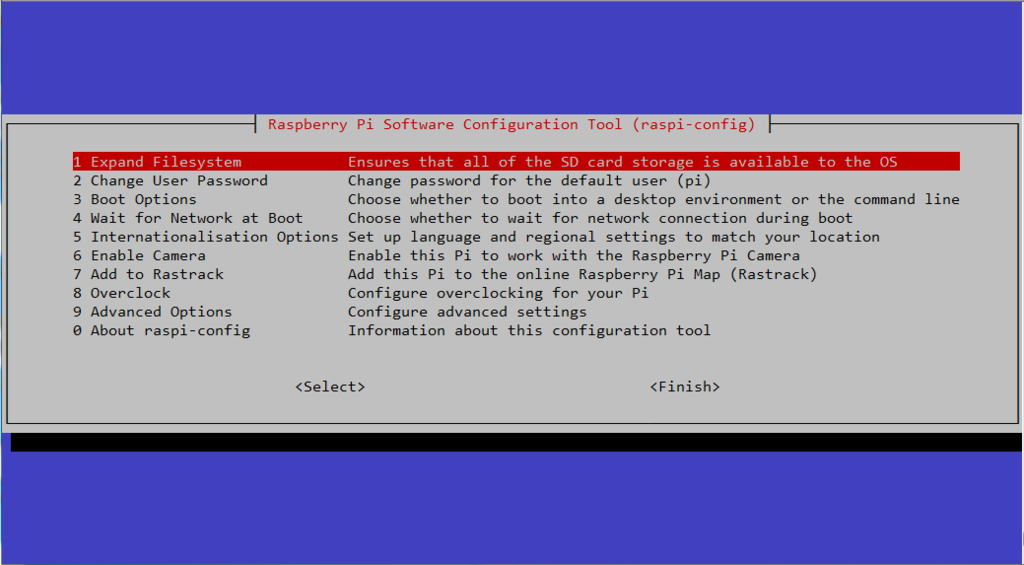
カメラを有効化するかどうか聞かれるのでYesを選択します

無事有効化できたら確認の画面が出た後に、再起動するか聞かれるので一応再起動しておきましょう
3. mjpg-streamerのinstall
streamingソフトのmjpg-streamerをinstallします
### download
$ cd ~
$ git clone https://github.com/jacksonliam/mjpg-streamer.git mjpg-streamer

### install
$ cd mjpg-streamer/mjpg-streamer-experimental
$ sudo apt-get install libjpeg8-dev cmake
$ make
$ cd ../../
$ sudo mv mjpg-streamer/mjpg-streamer-experimental /opt/mjpg-streamer

### 起動
$ LD_LIBRARY_PATH=/opt/mjpg-streamer/ /opt/mjpg-streamer/mjpg_streamer -i "input_raspicam.so" -o "output_http.so -p 9000 -w /opt/mjpg-streamer/www"
以上でストリーミングがはじまります。
http://${IP}:9000にアクセスすると以下のようにmjpg-streamerのroot pageが表示されます

左にあるタブを選択することで、Staticでその画像、Streamでストリーミング映像が表示されます
4. オプションの設定
input_raspicam.soにオプションを指定することで色々と条件を変更することができます
### for input_raspicam.so option
-fps  # FPS
-q    # set JPEG quality 0-100, default 85
-x    # width of frame capture, default 640
-y    # height of frame capture, default 480
-br   # Set image brightness (0 to 100)
-ex   # Set exposure mode (see raspistill notes)
-mm   # Set metering mode (see raspistill note)
reference
RaspberryPi3 初期設定
RaspberryPi3にraspbianをinstallして初期設定を行う方法です
1. SDカードをいれて、ケーブル等をつなぐ
SDカードにraspbianのimageをいれて、SDスロットにさし、電源ケーブルに繋ぎます
この時点でraspberryPiの装備は
- raspberry Pi3
- SDカード(raspbian image)
- LANケーブル
- USBキーボード
- USBマウス
- HDMIケーブル(to ディスプレイ)
2. 電源を入れる
電源をいれるのは簡単で、基盤の「PWR IN」というところにmicroUSBの電源ケーブルをさせば電源が入ります
あとは自動でinstallや設定が行われて、以下のようなraspbianのGUIが表示されます

3. ネットワークの確認
GUIからコンソールを開いてネットワークを確認します
割り振られたIPの確認
pi@raspberrypi:~$ ifconfig
eth0      Link encap:Ethernet  HWaddr b8:27:eb:c2:b2:c8
          inet addr:192.168.11.22  Bcast:192.168.11.255  Mask:255.255.255.0
          inet6 addr: aa80::bb65:cc31:dd5:20/64 Scope:Link
          UP BROADCAST RUNNING MULTICAST  MTU:1500  Metric:1
          RX packets:13522 errors:0 dropped:8 overruns:0 frame:0
          TX packets:3058 errors:0 dropped:0 overruns:0 carrier:0
          collisions:0 txqueuelen:1000
          RX bytes:16528566 (15.7 MiB)  TX bytes:274511 (268.0 KiB)

lo        Link encap:Local Loopback
          .
          .
          .

wlan0     Link encap:Ethernet  HWaddr a8:b7:cb:d7:e7:fd
          .
          .
          .
上記のeth0のipアドレスを利用することで、同じネットワーク内のPCからraspberryPiへアクセスすることができます
(上記では192.168.11.22)
アクセスできない場合はeth0の設定を見てみる
pi@raspberrypi:~$ cat /etc/network/interfaces
# interfaces(5) file used by ifup(8) and ifdown(8)

# Please note that this file is written to be used with dhcpcd
# For static IP, consult /etc/dhcpcd.conf and 'man dhcpcd.conf'

# Include files from /etc/network/interfaces.d:
source-directory /etc/network/interfaces.d

auto lo
iface lo inet loopback

iface eth0 inet manual   ### staticとかになってないか確認

allow-hotplug wlan0
iface wlan0 inet manual
    wpa-conf /etc/wpa_supplicant/wpa_supplicant.conf

allow-hotplug wlan1
iface wlan1 inet manual
    wpa-conf /etc/wpa_supplicant/wpa_supplicant.conf
